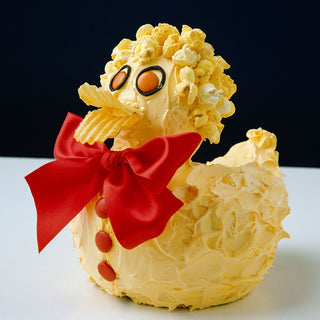
If you’re nostalgic for the classic Women’s Weekly cakes from the ‘80s or a fan of Bluey, the Duck Cake is a timeless favorite you'll love to make! Recreate the magic at home with our step-by-step guide, and see if your Duck Cake can rival the delight of Bandit’s rubber ducky cake creation!
Ingredients:
- 2 packets butter cake mix
- 2 bamboo skewers
- Buttercream Icing
- Apricot food colouring
- Round flat sweets (for eyes)
- Licorice
- Popcorn
- Potato chips
- Wide ribbon
Equipment Needed:
- 25cm x 8cm (10in x 3in) bar tin
- Deep 20cm (8in) square cake tin
- Small serrated knife
- Small spatula
- Wire rack
- Cake board or serving plate
Step 1: Prepare and Bake the Cakes
-
Preheat and Prepare: Preheat your oven as per the cake mix packet instructions. Grease the bar tin (25cm x 8cm) and the deep square cake tin (20cm).
-
Mix and Pour: Prepare the butter cake mix as directed on the packets. Pour a quarter of the mixture into the greased bar tin, and pour the remaining mixture into the greased square cake tin.
-
Bake: Place both tins in the preheated oven. Bake the bar cake for approximately 30 minutes or until a skewer inserted comes out clean. Bake the square cake for about 1 hour or until cooked through. Remove from oven and cool on a wire rack.
Step 2: Shape the Cakes
-
Cut the square cake vertically into two equal halves. Place the bar cake on its side and cut it in half horizontally. Then, cut a wedge-shaped piece from one end of the bar cake.

-
Place the two halves of the square cake side by side with the cut sides facing up and the bases touching. Trim off the four corners, removing more from one end to shape the duck's tail. Next, cut a wedge-shaped piece from the tail end to shape the body. Discard the cake scraps.

-
Take the reserved piece of the bar cake for the head and neck. Cut a small wedge from each side, about 2 cm (¾ in) from the end where the first wedge was cut. This angled end will join the neck to the body.

- Shape the duck’s body by making a slanted cut at the tail end, cutting downward at an angle for about 2.5 cm (1 in). Then, cut upward from the tail towards the front of the body, still at an angle. Use a small serrated knife to carefully round the edges, giving the body a smooth, curved shape.

- Position the head and neck piece on the body, and secure it by inserting two bamboo skewers through the body to hold it in place.

- Carefully shape the head with a serrated knife so the neck fits snugly on the body. Trim the ends of the skewers, but ensure they remain in place to support the head.
Step 3: Decorate the Duck
-
Prepare Frosting: Tint the icing with apricot food colouring to achieve a duck-like hue.
-
Frost the Cake: Cover the head and body of the duck with the tinted icing. Leave the icing on the sides fluffy to resemble feathers. Use a small spatula to smooth the icing on the head, neck, and chest.
-
Add Details: Place round flat sweets as eyes and buttons on the duck. Use thin strips of licorice to outline the eyes. Use popcorn to represent feathers on the head and use two large potato chips for the bill.
-
Final Touches: Complete the duck cake by placing a wide ribbon around its neck as a decorative bow.
-
Presentation: Transfer the decorated duck cake onto a cake board or serving plate for display.
Ready to dive deeper into the world of creative and budget-friendly cakes? Head over to our Budget Friendly Birthday Cakes blog for a treasure trove of delightful ideas that won't break the bank. If you’re a Bluey fan planning a themed party, check out our Throwing The Best Bluey Party In NZ blog for tips, tricks, and more fun cake inspirations. Whether you’re celebrating with a nostalgic Duck Cake or exploring new themes, we’ve got you covered for every festive occasion! Happy baking!

